
From Start To Finish
With almost 5 hours of high-quality training, you’ll learn how to retopologize a full character from start to finish. We cover how to prepare your model in ZBrush, block out the most important loops and how to connect everything up. This exact method has been used for retopo of characters like the Xenomorph from Alien Covenant, and many more.
For All 3D Software
Follow along in your favourite 3D software, like Blender, 3ds Max and Modo! While we’re using Maya 2018, the principles are exactly the same in all other tools. As long as you know how your retopology tool works, you should be able to follow along with no problem, using your preferred 3D package!
Learn How to Retopo for Film
This technique for retopology has been developed while working in the film industry, where the topology requirements are intense! Once you know this method, you’ll be able to retopologize your own characters time and time again. It’s a formula which can be repeated on any character, regardless of style and complexity.
Professional UV Layout
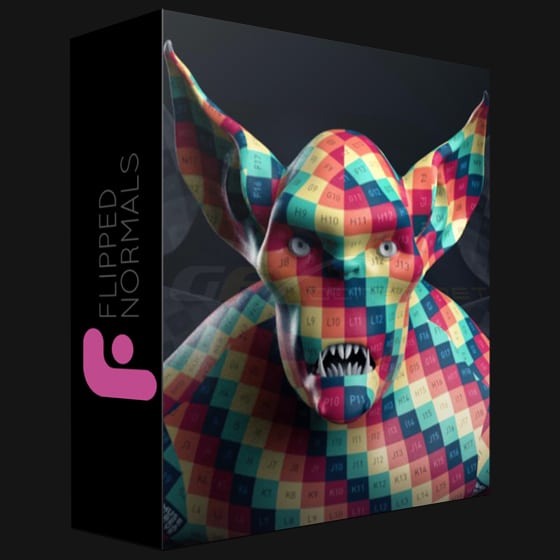
Learn how to quickly and efficiently UV map a full character, which not only has no stretching, but also will be ready for texturing in Mari. By the time we’re done, the character has a very practical UDIM layout, perfect for Mari. You’ll also learn how to copy UVs from one model to another, like the teeth and claws.
Level: Intermediate/Advanced
This tutorial is made for people with an intermediate understanding of how 3D software works – and who wants to take their work to the next level. While all the steps are shown, it’s expected that you know Maya (or your preferred 3D software) works.
Download Links:-

UV_Mapping.part1.rar
UV_Mapping.part2.rar
Mirror :-

UV Mapping.part1.rar
UV Mapping.part2.rar
Mirror :-
http://nitroflare.com/view/700BC4694446DBC/UV_Mapping.part1.rar
http://nitroflare.com/view/2BBAB2EFD35761A/UV_Mapping.part2.rar